 Mechanical
Music Digest™ Mechanical
Music Digest™ |
| You Are Not Logged In | Login/Get New Account |
|
Please Log In. Accounts are free!
Logged In users are granted additional features including a more current version of the Archives and a simplified process for submitting articles. |
|
|
MMD
|
|
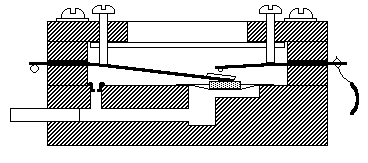
A New Design to Make Contact Pouch Boards for Converting Player Roll Pneumatic Signals to Electrical Contact Closures by Richard Vance
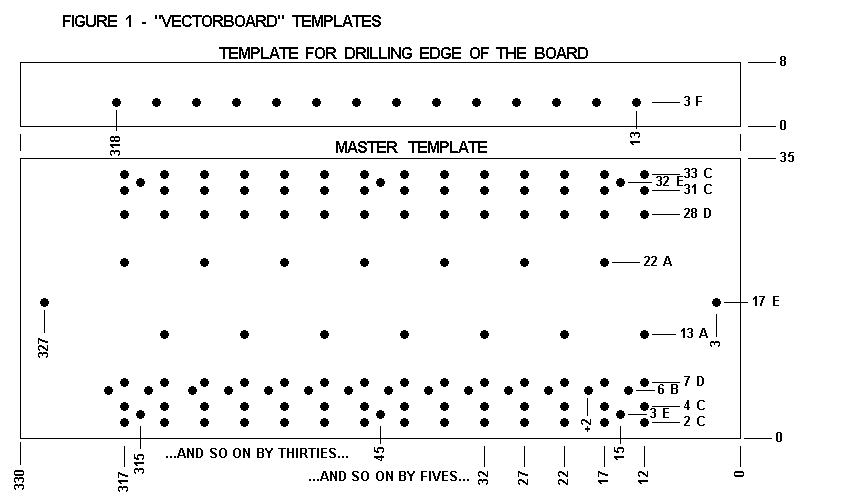
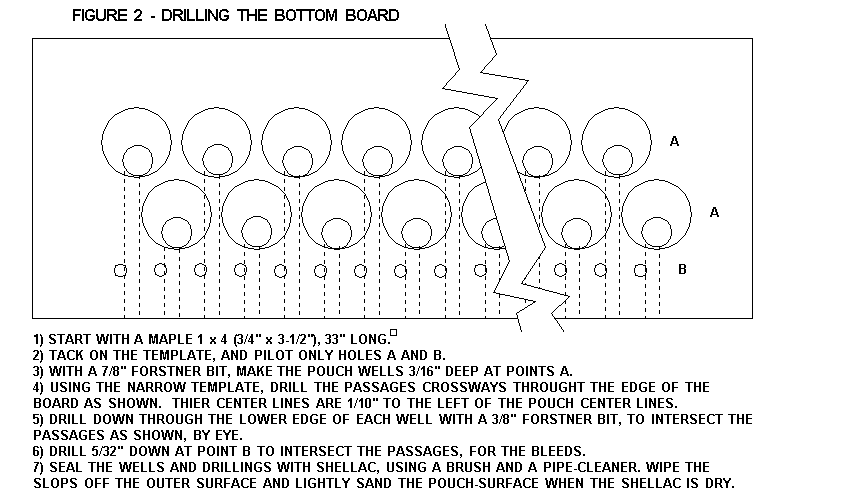
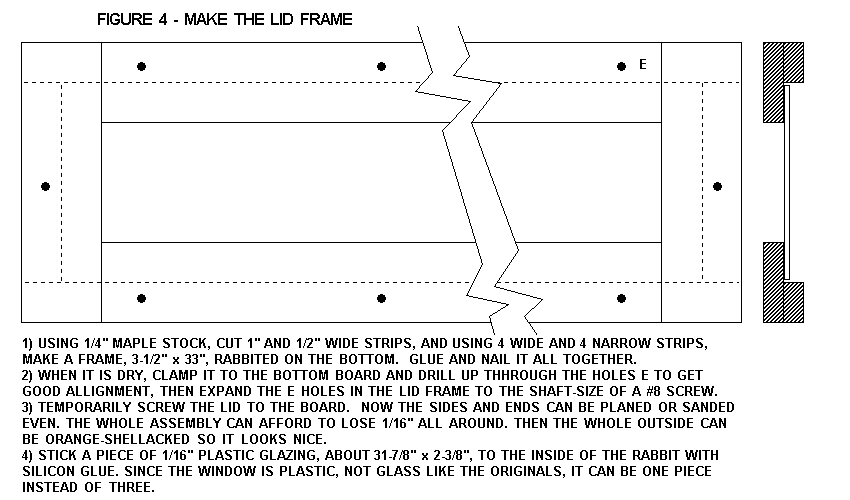
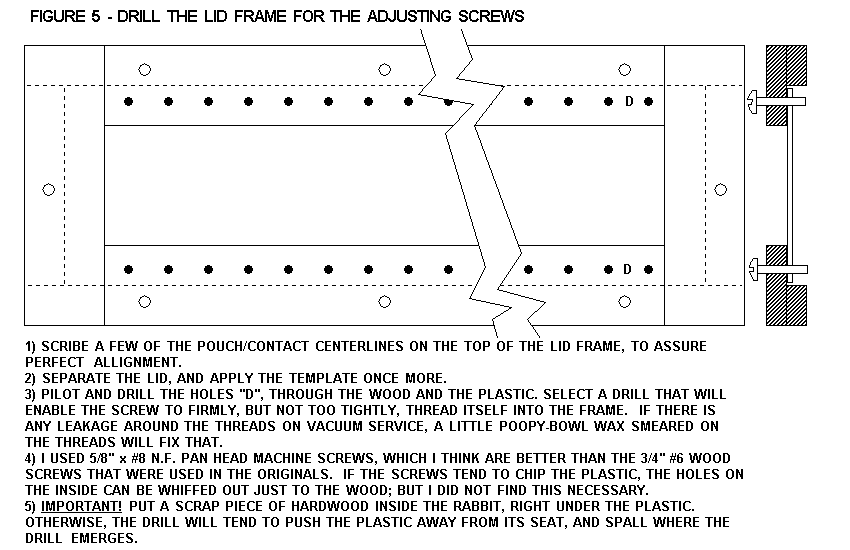
Mr. Taylor asked me to describe the replacements that I made, so I prepared the following drawings, detailing my procedure for building them. This design closely follows the concept of the later Aeolian pouch-contact boards used in the Duo-Art 176-note pipe organs. But the design is somewhat modified to make them easier to build using current materials and the common shop methods available to any rebuilder. I only have a cheap table saw, and a moderately good drill press, so I confined the design to using standard 'craft-project maple stock' (Note 1) to avoid any complex joinery. These boards have 62 notes; a few spares won't hurt. Of course these boards could be used for any system requiring music rolls to be read electrically. They will work vented, for any organ using a pressurized spoolbox, or connected to a vacuum supply and using larger bleeds, for a more normal roll reading system. My secret for making accurately and closely spaced drillings in complex wooden parts, is to make a template, using 'Vectorbord' (Note 2) or other phenolic sheets punched on a 1/10" by 1/10" grid, used for breadboarding electronic circuits. The required hole centers are counted off on the 10 x 10 grid, and marked with a felt pencil. Then the template is tacked to the workpiece, and using a small drill, shallow holes are drilled through the marked perforations. Then the template is removed, and the tiny 'pilot holes' will accurately center the points of drills or Forstner bits for the actual boring. This seems like double work, but with a decent drill press, the work
goes fast, and the results are worth it. For a long piece, it is
not necessary to make a template for the entire length; one can shift it
along as one works. I made 4 of these boards at one time. The
procedure seems complicated, but it is sort of 'mass-producey', and the
work goes quickly once one gets the hang of it.
TESTING THE COMPLETED ASSEMBLY In a 116-note organ, the pouches are pressurized only by the normal organ wind, 3-1/2" to 4" WC. Therefore, the pneumatic channel and the pouch must be very leak-tight to get reliable operation. Zephyr skin pouches must be used, and they must be laid with hot glue, so that their entire free area is flexible. (White glue will soak into the leather a little way towards the center, stiffening the edge, and reducing the effective area..) The testing is best done in or near the organ, with the tubing disconnected. Start with the cover off, so the contact blades are horizontal, up out of the way. Turn on the wind supply, but remove the power from the contact board bus. Connect the 'common' from a ringer to the bus. Cover the tracker bar with adhesive paper; use wide paper "correcting tape", not masking or cellophane tape. Only paper can be accurately pierced without tearing. Select a sewing needle the same diameter as the hole in the bleed, and pierce the center of the paper covering one of the tracker ports. Take the tube from this port, and temporarily tee in a manometer, and a long piece of test tubing, and close the spoolbox door, so that "note" is pressurized. Now with two orifices the same size, the intermediate pressure between the tracker bar and atmosphere should be about half of the wind supply pressure, about 2" WC. As you move the test tube from one nipple to another, this average value should become apparent. Check each pouch; any found showing a lower pressure has a leak in the channel or a pinhole in the pouch, which has to be mended now. When this test is completed satisfactorily, make the preliminary settings
for the contact blades. Back out the adjusting screws so the contact
blades start out horizontally, and put the lid on the board. For each contact
in turn, lower the longer contact blade till it just touches the pouch
center. When the test tube is connected, the pouch should lift slightly.
Adjust the position of the lower blade up or down, until position where
this movement is maximized; the level where the
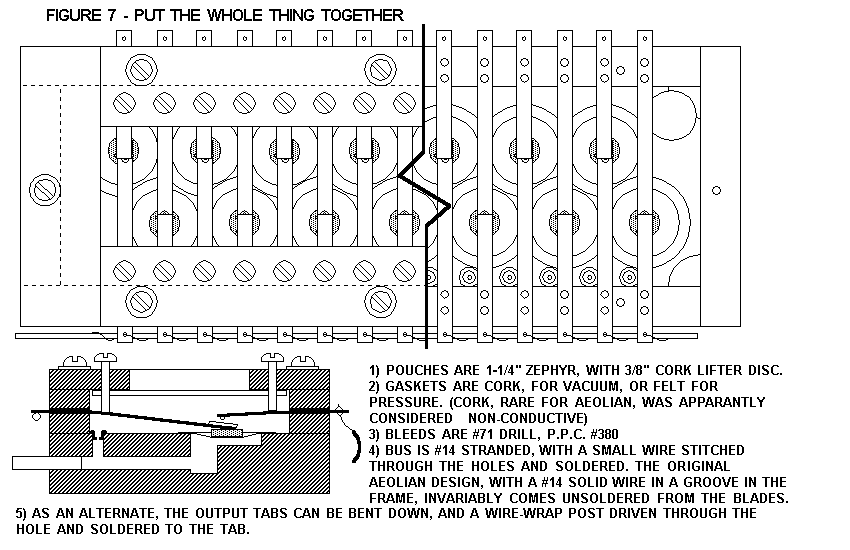
Now install and completely tube-up the unit. From now on, the testing is done from the spool box. Starting with the note already pierced with the small needle, the manometer and motion test should respond the same way as before, unless there is a leak in the tubing from the tracker bar. TIP: The original manifold of lead tubing from the back of the spoolbox to the flange block on the original contact assembly will have to be replaced. Remove the drilled block at the rear of the spoolbox, where the old lead tubes were terminated, and attached to the tracker bar with short pieces of rubber tubing. Drill out the holes in this block, to one size smaller than the OD of new 9/64" tubing. With this block reinstalled, cut new tubing to a long angle; thread the point through the hole, and pull it through from the back. Cut off the tapered end; attach it to the tracker bar nipple, and run the other end to the contact board nipple. Now there are no intermediate joints on the circuit, and the chance of any leakage from the tracker bar to the contact board is very small. Tubing pulled through the slightly undersized holes will seal at the holes, preserving the pressure integrity of the spoolbox. Pierce each hole in turn, first with the small needle, observing a definite, but perhaps feeble contact closure as before. Now choose a larger needle, just a little smaller than the hole in the music roll. Expand the hole in the paper with this needle. Now the pressure in the pouch will be much closer to 4" WC, and reliable contact action should be observed for each note. Final adjustment of the upper contact blade can now be made, leaving a good contact gap, but closing promptly every time. After a few holes have been tested, cover these ports with scotch tape, and move on. This testing involves a lot of sliding the spoolbox door open and closed, to get the note to repeat, but is moves along quickly if the preliminary tests and adjustments were done carefully. MATERIAL SOURCES Note 1) If you don't have a good ripsaw and joiner, 4' lengths of 1x4 and 1/4"x4 pre finished maple can be found in the "craft lumber" display rack at any of the big home improvement warehouse stores. Note 2) My illustration shows only a 12" length template, much shorter than the entire board. Radio Shack sells small pieces of 10 x 10 board that can be used for a smaller template, but big electronic shops or mail order catalogs have 17 inch lengths of Vectorbord; one can make a longer template, and thus reduce the amount of shifting required. Click here Digi-Key for one source. Figure 5 and 6) Phosphor bronze strip, silver contact wire, brass escutcheon pins, and Zephyr skin pouch material can be had from Organ Supply Industries, Erie, PA Click here OSI for the address. Figure 6) Bleed cups and nipples are sold by Player Piano Company (PPCo), 704 East Douglas, Wichita, KS 67202, tel. 316-263-3241
30 January 2000 |
 In
a recent discussion in MMD with Bob Taylor, about the complex "primary
valve and pull-down" pneumatic to electric roll reader used in early Aeolian
116-note pipe organs, I mentioned that I had replace mine with the later
"pouch and contact" boards. I have seen other organs where the same thing
was done professionally, during the organ's original lifetime. The
original units were unnecessarily complex, noisy, and virtually impossible
to repair easily.
In
a recent discussion in MMD with Bob Taylor, about the complex "primary
valve and pull-down" pneumatic to electric roll reader used in early Aeolian
116-note pipe organs, I mentioned that I had replace mine with the later
"pouch and contact" boards. I have seen other organs where the same thing
was done professionally, during the organ's original lifetime. The
original units were unnecessarily complex, noisy, and virtually impossible
to repair easily.


|
|
|
|
|
|
|
|
|
CONTACT FORM: Click HERE to write to the editor, or to post a message about Mechanical Musical Instruments to the MMD Unless otherwise noted, all opinions are those of the individual authors and may not represent those of the editors. Compilation copyright 1995-2026 by Jody Kravitz. Please read our Republication Policy before copying information from or creating links to this web site. Click HERE to contact the webmaster regarding problems with the website. |
|
|
||||||
|