
Chapter 5.3 - The Bass Pallets and Pulldown Pouches
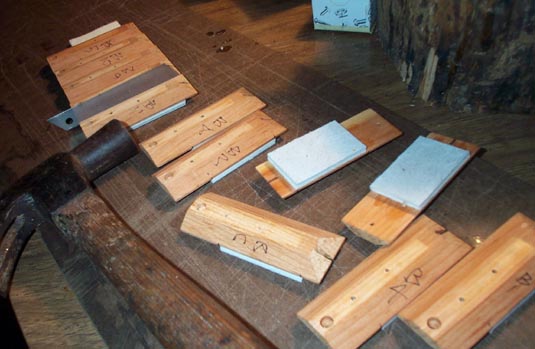
The large bass reed pallets are releathered. Make a composite of medium goatskin and 3/32" pallet felt, OSI number 6101.02.
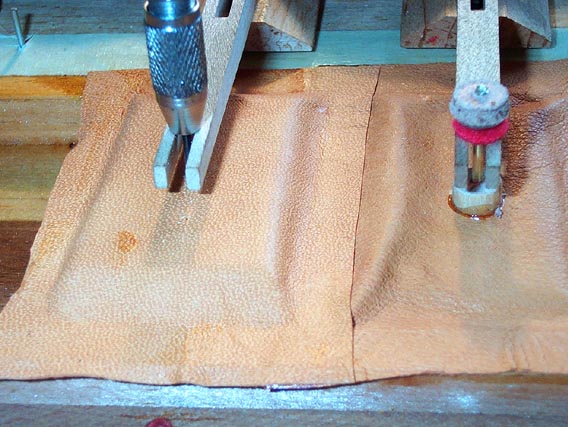
The pallet levers are removed, and the pallets are glued, edges touching, to the strip of valve composite. There is not much margin between the edges of the pallets and the seat holes, so it is essential that the pallets are cut apart very accurately, with the cut perfectly vertical, I discovered that it is much easier, and more precise, to cut the pallets apart by a Guillotine action, rather than a cut with a snap knife. A large, whole new snap knife blade is held vertically, between the pallets, and gently tapped with a hammer. This technique is quick and gives perfect results every time, and will be used later for the 348 rank chest pallets, which have an even narrower margin for error.
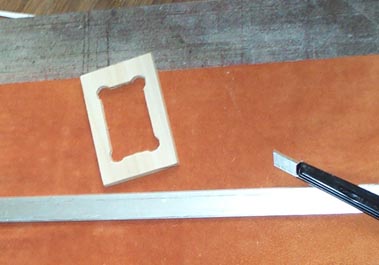
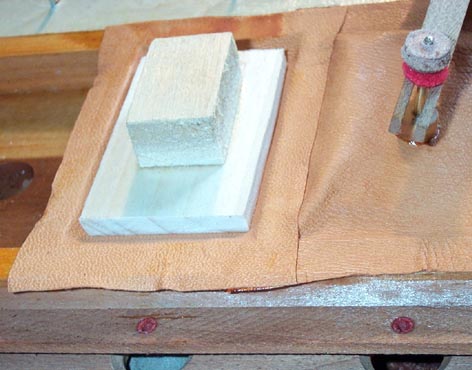
The big square pouches have a wooden follower inside, which has to be exactly in the center of the pouch. To cut the pouches, and center the follower, I made a wooden template. Its outside dimensions are the size of the pouch plus 1/16" to allow for the dip, and a hole that just fits the follower is cut in the center. First cut a strip of pouch leather as wide as the template is long. Put the template on the strip, and set the follower, with the glue applied to its top surface, in the hole. Only a narrow strip of glue was used, around the center of the follower. Trim the pouch to width using the edge of the template. Then, holding the follower in place, lift the template and move it to the next place on the strip.
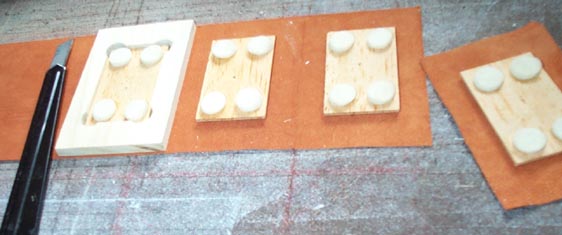
The pouches are glued to the wells, with the edge of one overlapping the previously laid one. Working one well at a time, trim off any of the previously laid pouch that extends over the edge of the well. Mask the flexible part of the previously laid pouch. The pouch being laid has its top and bottom held folded back with tiny bits of tape, so that one can see the follower. Apply glue all around the edges of the well, and quickly pull off the masking tape on the old pouch, so that excess glue on the tape does not get on any bit of the pouch that might overlap the previous pouch's flexible area. Drop the prepared pouch onto the well, using the visible corners of the follower to center the follower in the well. Press down the sides of the pouch; unhitch the little tapes, and press down all the edges of the pouch, pulling them tight without shifting the position of the follower. Finish by dipping the pouch with a bit of wood cut to the same size as the follower, and smoothing out the edges. The first picture just shows the centering process without glue. There was no way to do all the steps quickly enough, and take pictures too. Also note that this technique requires some development; I spoiled several pouches until I figured out how to lay them so the follower ended up in the center of the well.

Now install the pallet. It is impossible to make the link wire hole in the follower exactly match the position of the slot in the pallet lever ahead of time. Using the lever slot as a guide, drill the wire hole with a 1/16" drill in a pin vice. Aeolian must have used some similar technique; the existing wire holes in the pouch followers were in different locations, not always in the exact center. The drill will catch in the newly made hole, so one can use it to pull up the pouch to make sure it is not stuck to the side of the pouch well anywhere. The link wire is a piece of ordinary threaded stem wire, with a 5/8" length of the threads whiffed off bu spinning the wire in the drill press and squeezing the area to be smoothed with a serrated jaw pliers. A wooden regulating button, Schaff #541, is put on the wire, and glued, as a sort of jam nut and reinforcement, as in the original. Like all the note pulldowns in the organ, these pouches were originally set rather fully extended, with only about 1/16" lost motion, to insure that the pallet will close firmly against its seat.
The heel rest pad strip was moth eaten and had to be replaced. Luckily the stick came off in one piece, but the felt on it has to be very thin. I had some of the thinnest name-board felt, Schaff item #312R, which matched the original.
Here is the final result. The pallet springs are attached to a removable strip that is screwed on right over the upper margin of the pouches. Because of slight dimensional variation, each pallet is unique to its own position, so they are all numbered so they can go back in the right place if they ever have to be removed.

At this point, I stopped and put everything together on the organ base. (See chapter 6). For the assembly, the spreader board and the chest front bung were temporarily attached. Now I could pressurize the bass chest, and test the work so far. To make the pallets "work", I removed the valves stem guide strip, and covered the upper valve seats with tape. The tape was pierced at each valve with an awl, to make about an 1/8" hole; sort of a big bleed. Individual pieces of tape were placed over each lower, atmospheric, valve seat. When the organ was pumped up, each big pouch could be vented by pulling off this tape. When the tape was put back, the pouch repressurized through the "bleed". This each pallet could be tested functionally. Of course, no music came out at first. When each reed was pulled and the pallet opened, an incredible amount of dust, rubbish, and dead bugs blew out. Then it was possible to test each pallet for tight reclosure by inserting an ear tube into each reed cell and listening for leaks. But after the reed cells and the reeds were cleaned, it was possible, however awkwardly, to "play" the thirteen bass notes. A red letter day; the first music!