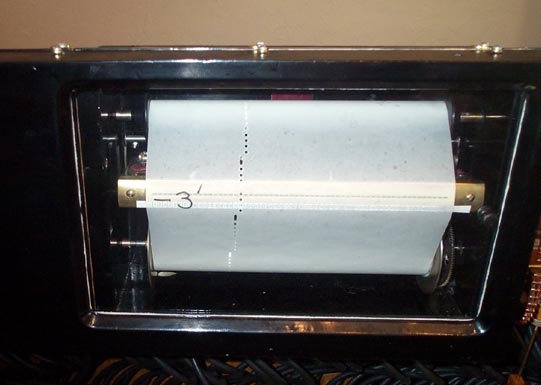
Chapter 18.6 - Testing the Secondary
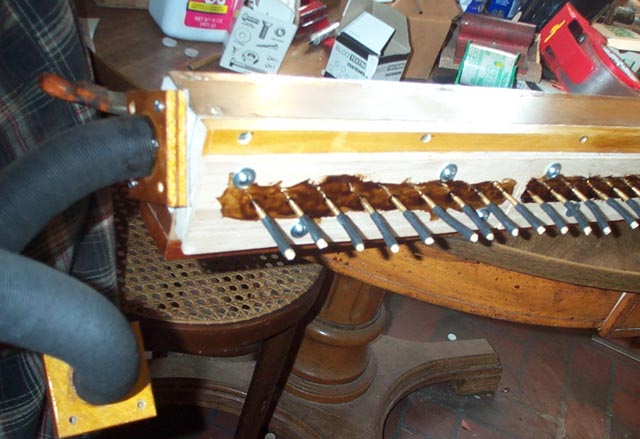
To test the secondary, I first made six boards out of scrap 1/4" plywood to cover the openings in the back. Since all six backplane panels are drilled alike, it was quick to stack up all 6 boards and drill them at once. Plugged nipples were inserted as shown. A temporary hose was rigged for the wind supply, so that secondary could be located out in front. There is no way to easily reach it when it is in its correct place, behind everything.
The cover was left off, and the windway and the valve cells were covered with heavy transparent packaging tape. It will hold the pressure, if the wood is sensitized by wiping it with a paper towel soaked with lighter fluid. A tube was led from the output of the lowest note primary, so that the valve can be operated at its correct pouch pressure, using the keyboard.
For each valve in turn, the tape window was cut out of the front of the valve cell. With the cell open, the valves were properly set, in relation to the pouch. By holding the button with a long nose pliers, and reaching into the cell with a small screwdriver, one can spin the valve disk by its edge, thereby moving it up or down the stem. For maximum effect, the follower should be as far down into the well as possible, but not actually resting on the empty pouch. First the lower disk is moved if necessary to get this correct. Then the upper disk is moved up or down, to leave a uniform valve gap of a light 1/8". By rapidly operating the valve with the key, one can hear the action. The valve should make a firm but gentle thwack as it hits the top seat, and a similar, but softer noise, as it falls back to rest. While the cell is still open, the upper seat is tested for leakage. There seems to be no way to devise any absolute test for this, since the valve is double seated, and there is always one passage open that prevents trapping the leak flow for detecting it with the bubble jar or manometer. But an ear tube placed close to the seat will detect the hiss of any significant leakage. A few leaks were found, that were caused by trapped dirt or a wrinkle on the hidden side of the valve leather. These all were cured by turning the whole valve around, and removing the offending obstruction with a tiny screwdriver.
The cell was then closed up again with another piece of tape, rather reminiscent of debugging an Aeolian player piano stack. Then the lower seat could be likewise tested for leakage with the ear tube. A couple of "simmers" were heard, necessitating opening the cell again and repositioning the stem a little higher off the empty pouch.
Somewhat tedious work, but it paid off; subsequent testing found errors, but not in the secondary itself. For testing the unit assembled in its final position, I found it useful to make adhesive labels indicating the note numbers. This shows samples of each kind (actually several sets on each of three sheets of Avery 8-1/2 x 11 sticky paper) at 50%. These strips are cut out and pasted on the lower edge of the tracker bar, the "keyboard spaced" nipples on the primary and touch box, and the 1" spaces on the secondary and the reed ranks, respectively. This saves having to count the tubes when tracing a signal.
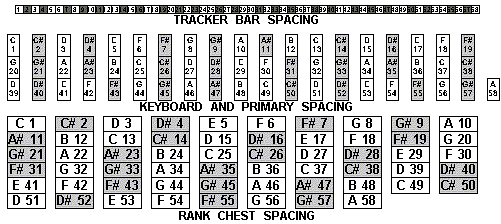
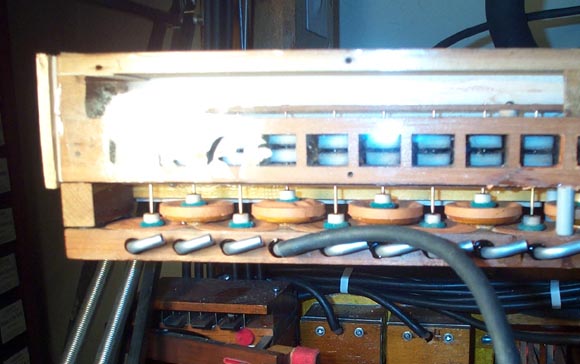
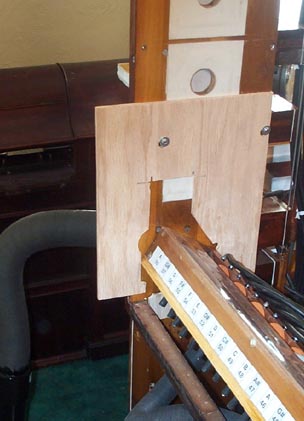
Two pieces of scrap 1/4" plywood were cut out with shapes that allows the secondary to be positioned either upright, or at an angle that allows access to its front, while keeping its wind holes over the holes in the stop chest in either position. The most important test tool proved to be the pouch block shown in the second picture. It is the same pouch block used in the primary test, but fitted with a heavier weight, made of five nickels soldered together and firmly screwed to the center of the pouch. It is connected to the secondary output with a short tube. When the secondary vents, the weight causes the pouch to drop very quickly, and the nickels make a sharp "clack" when they hit the bottom of the pouch well.
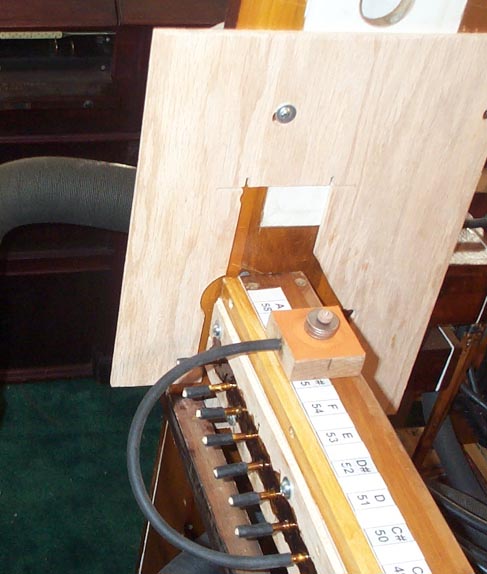
The primary was installed, and tubed up to the secondary, for the "speed of response" test using Kevin McElhone's test roll. Each note on the test roll has a trill of eight single punchings, spaced 1/6" apart. The roll speed was carefully calibrated to tempo 100, ten feet per minute. At this speed, the trill warbles at 12 Hz., far faster than any trill on a music roll, since tempos of 100 are rarely if ever called for.
For each note in turn, the pouch block was connected, and the response was tested, from both the keyboard, and the roll. For a note that was working properly, the pouch block produced a rapid series of clacks when the trill was played, and the the pouch was seen to be rising and falling vigorously in time with the trill. All but eight of the notes passed this test. The bad ones were marked on the label for further assessment.
1. The first thing I noticed when testing the notes from the keyboard, was that the notes were "too responsive"; that is, the notes "played" when most of the keys were only very slightly depressed from their rest positions. The primary acts as a very high gain amplifier (virtually on-off). No matter how slowly the key is depressed, a point is reached when the secondary suddenly vents, producing the clack. Without the benefit of any speed of response measure, I had set the key motion too close to the rest position of the touch box pallets, so the action was too close to the beginning of the key dip. Now, I had an easy well to tell when the secondary vents and actually plays the note. I stopped here and went back with the special screwdriver I had made to adjust the fulcrum screws on the lever that connects the key to the touch box pallet. Each fulcrum screw was backed off, about 1/4 to 1/2 a turn, so the clack occurred half way down the key dip. This cleared up three of the seven bad notes. One of the reasons an instrument will not follow a fast trill on a music roll is that the bleed is too big, that is, the short, closely spaced perforations can not close off the primary pouch enough between the notes to allow it to repressurize fully. Readjusting the key pallets cured three of the bad notes. Apparently some of the key pallets were not fully closing. When the organ is in "Manual" mode, the key pallet wind box is not pressurized, so such a leak produces a path from the primary circuit to atmosphere in parallel with the bleed, resulting in an apparent "too big" bleed.
2. To further debug the remaining bad notes it was necessary to isolate which of the components in the system was at fault. First, to determine if the secondary itself was at fault, the tube from the primary to that secondary was pulled off, and the tube from an adjacent primary, know to work, was substituted. In every case, the offending secondary then passed the test. So it was proved that these secondaries were ok, if actuated by a properly working primary. Careful adjustment of the secondaries had paid off, so I stopped here and removed the leaky tape from the secondary chest and buttoned it up with the regular lid. Three down and four to go.
3. Now to determine if the faults were still in the manual pallet chest system. By pinching off the tube from the touch box to the primary, and then connecting that primary to another key known to be good, misbehavior in the touch box is eliminated. Two of the bad notes were cured by doing this. So those two notes still had some additional "bleed" contributed by some leakage in the key circuit. I hated to contemplate opening the touch box, because this involves removing the whole spoolbox assembly and the stop rail; it is located way down in there, behind the back of the keyboard. Thinking that some bit of rubbish under the key pallet was preventing full closure, I attached a tube to the key pallet output, and blew hard into it while working the key repeatedly. This must have been the case for one of the offenders, dislodging the rubbish cured that note. But the other one, no. 11 proved stubborn. But as I reached along the tube leading from the key to the primary junction block, I felt a rough spot. Pulling off that tube, I discovered a little bite mark.
My kitty loves to play with loose rubber tubing, bouncing it around and attacking it with claws and teeth. Before I discovered this, and put it away, he must have gotten to my coil of stock, and bitten a hole in it. Just big enough to provide the extra bleed needed to produce a working, but sluggish primary action. When this tube was replaced, note 11 worked fine. Now the touch box was eliminated as a source of malfunctions. Five down and two to go.
4. Now the problems had to be in the primary, or the tracker bar directly connected to it. Removing the wind box lid on the primary, I found loose screws in the group holding the primary pouchboard to the spoolbox manifold block. I had used elk skin for the gasket there; this thick leather takes a while to "set in" because it is hard to fully compressed it at its first installation. Retightening this joint cured bad note no. 49. Now only no. 58 remained. Observing the primary valve action with the lid off, it was seen to be not very snappy, compared to the others. The primary valve follower was a bit too high in its pouch well, preventing full switching from atmosphere to pressure as it rose. Readjusting that primary's valve disks on its stem cured that problem.
Then the system was buttoned up again, and the test roll "trill test" was run again, all across the compass. Now all the notes produced the satisfying staccato of clacks as each trill passed over the tracker bar.