 Mechanical
Music Digest™ Mechanical
Music Digest™ |
| You Are Not Logged In | Login/Get New Account |
|
Please Log In. Accounts are free!
Logged In users are granted additional features including a more current version of the Archives and a simplified process for submitting articles. |
|
|
MMD
|
|
by Johan Liljencrants (040125 MMDigest) Elementary concepts and warnings to amateur audio recording, with a scope to preserve good quality at a moderate budget. Following a theoretical background, some specific tips are included, to enable the reader to replicate my system of which there is a recording example at the MMD Sounds archive (johan_keler956.mp3, 2,187 kb). Theoretical backgroundRoom acoustics and microphone distanceA recording chain starts with the source and its environment. One thing is the direct sound, which in a sense is a true input. Another is the environment that creates reverberation, but also may add other sounds like audience or various noises, desired or not. A first observation is that the level of the direct sound decreases by 6 dB (half sound pressure) for each doubling of the distance to the source. When emitted into a room this sound will bounce against any limiting surfaces for some time, creating a more or less diffuse sound field. At each bounce a fraction of the sound is absorbed so the reverberation gradually dies out. An important characteristic of this is the reverberation time, defined as the time it takes for the reverberating sound pressure to decrease by 60 dB after the source has been turned off. (After W C Sabine who at the dawn of room acoustics at MIT around 1900 excited a room by blowing an organ pipe, and then with a stopwatch measured the time until he could no more hear any reverberation). Typical reverberation times are in a living room up to 0.5 sec, auditorium 0.5-0.8 sec, concert hall 0.8-1.5 sec, church 1.5 sec or more. Reverberation time T in seconds can be estimated from Sabine's formula : T = 55*V/(cA)
The absorption area is an abstraction from when you imagine the room as lossless except for a hole in the wall of area A. All sound energy hitting that area is lost. Practically, A = S*a where S is the physical area of a surface in the room and a is the absorption coefficient, the fraction of energy absorbed when sound hits that surface. a is typically 0.02 for concrete, 0.10 for wood, going up to about 0.50 for heavy curtains. - Computing reverberation time for a room from its surfaces is notoriously unreliable. In practice one would always make a practical measurement from the reverberation decay following an excitation, e.g. from a handclap or a shot. After that, knowing T and V, you can compute A from Sabine's formula. A second observation is that the level of this diffuse reverberation field is independent of the location in the room, reverberating sound waves have already traveled many times the dimensions of the room. At a certain distance from the source, the reverberation radius, the level of the direct sound is equal to the level of the reverberation. In a living room typically 0.7 meter, concert hall 4-8 meters. It can be computed from r = sqrt(A/16p). This r is essential for placing a recording microphone. Closer to the source than the reverberation radius the direct sound will be stronger. Further away the reverberation will dominate which one could take as stereo would no more be of interest. However, human perception includes the Haas effect (the precedence effect, the law of the first wave). You can still hear the incident direction of a sound (localize it) when the direct sound is up to some 10 dB weaker than the reverberation. This is because the auditory processor in your brain detects that the direct sound comes earlier than its reverberation. - In essence: microphone distance from the object controls the ratio between direct and reverberated sound. And stereo recording at microphone distances over three times the reverberation radius contains little directional information about the source. Room resonances may be a problem since they are widely spaced in terms of semitones at low frequencies. At a low room resonance, some places in the room you may have a high level, at other places almost no sound. And this pattern differs between notes. But toward high frequencies the room resonances come progressively closer and cannot be individually detected. The Schroeder frequency fs = 1900 sqrt(T/V), where T is reverberation time in seconds, V is room volume in cubic meters, tells the dividing limit above which resonances are no big problem since they come sufficiently close to each other. In a living room fs is typically above 100 Hz, in a concert hall some 20 Hz. Hi-fi people would know it is hopeless to get a uniform bass response in a small room, unless you damp it out heavily with upholstered furniture or other means in order to bring down T. There is a reason a performance space should be of sufficient volume, otherwise you are bound to get problems with the bass sound distribution. Another problem may come when the room has extensive parallel surfaces, little damped. Then the reverberation field can have strong non-diffuse components, periodic resonance peaks and flutter echo, such that you can 'hear the room' as an unpleasant confinement and coloring in a recording. Normally you do not notice that effect when being in the room yourself, because your perceptual system adapts to and compensates for it, cued by the room response to your own noises from movements and speech. Such compensation does not work with a remote listener to a recording. MicrophonesA microphone always has a small and light diaphragm that is set in motion by the impinging sound. This motion is converted into an electric signal, present at the microphone connector. From the view of its conversion mechanism a microphone is either electrostatic (condenser and electret microphones) or electrodynamic, not to mention a world of other esoteric or old fashioned principles, now seldom used.
Most ordinary audio microphones work well at sound levels up to 130 dB. At higher levels membranes can make such large excursions that their suspension become nonlinear, or they hit the back electrode, and there will be intermodulation distortion. A measurement microphone typically stands up to perhaps 20 dB more, but then on the other hand has a lower sensitivity and a higher noise floor. Stereo recordingThe purpose of stereo recording is to communicate a sound image to the listener, including a sensation of distance and direction to the sound source. This renders a more clear record, different sound sources are perceptually separable and are not so much muddled up with each other. Normally you would also want a controlled amount of reverberation to create a feeling of ambience. This control is basically done by selecting the distance between microphone and source.One of the earliest types of a stereo microphone is in a sense the best, namely an artificial head with a pair of pressure microphones where the ear canals are located. The head dummy interferes with the sound field in the 'correct' way, the microphone signals are a comparatively true representation of what you would hear yourself with your left and right ears respectively. The frequency dependent shading effect of the head and the inter-aural time difference is automatically taken care of. However, for optimal listening you should reproduce correspondingly. This means by headphones, such that the two stereo channels are kept separate. That setup is the closest you can come to a true reproduction for one specific listening position in the recorded environment. The appendix below describes my attempt at an artificial head. For simple stereo recording a classical means is the XY system where two directional microphone elements are located at the same point, what you have with a conventional 'stereo microphone'. Pressure gradient, or nowadays more often cardioid elements, one pointing half way to the left, the other as much to the right. This system is mono compatible which means you can add the two channels to get a good quality mono signal. A drawback is that stereo sensation is somewhat inferior because there are no time differences between channels. But you have to handle only one single microphone unit, a conventional consumer requirement. Nowadays, for professional recordings, more often the AB system is used, two microphones 0.2 to 2 meters apart, omnidirectional or preferably cardioid. This system is not mono compatible, when you add the two signals you get interference dips in the frequency response because of the different microphone-source distances. Artificial heads are seldom used with commercial recordings. One reason is that such are mostly intended for reproduction over loudspeakers where the channels do mix. Another is when the sound source is not small compared to the recording room, e.g. a bigger orchestra or organ. Then it may be impossible to find one single place where the sound is good enough for recording. In those cases there is a general need for control with a mixer console and for multiple supporting microphones. Then the sound engineer can control the properties of each resultant stereo channel, with the purpose to design an acceptable acoustic image. A commercial recording is mostly a designed product, not necessarily a 'natural' sound. Historically, at all times criteria and methods appropriate for a 'true' recording, as well as shifts of taste have been debated. A nice effect of stereo is that disturbing noises are often localized differently from the source of interest, such that a listener can 'hear away' from them. The mixing linkThe electromagnetic climate inside a computer is extremely hostile to low signal level analog circuitry, it tends to inject non-random noise and beeps into the signal. To protect from that, signals like those from the microphones should be routed in shielded cables and be kept away from interfering equipment. As a partial circumvention, it also appears computer sound cards now may even not have any microphone connector, instead you are supposed to feed a strong signal to a 'line input'. Even if not absolutely necessary, it is very desirable to include a mixer console as link between microphone and recorder/computer. One thing is that a console regularly contains necessary preamplifiers and phantom power if needed. Also, it is very much easier to control settings with good old hands-on knobs and buttons rather than doing everything with a computer mouse. Leave the mouse for only the Play and Record screen buttons and the file handling.Within foreseeable time professional equipment using 24 or 28 bit AD converters right up at the microphones and digital mixers would be too costly to an amateur. Any mixer will have a monitor phone jack with a separate volume control. Preferably use closed cup headphones that reasonably well close out the ambient 'natural' sound. At recording time you should not listen to that sound, but rather check over the monitor phones what is going into the recorder. The best is when you can keep yourself, mixer, and recorder in a room that is separate from the performance space. RecorderClassical analog recorders with cassette or reel tape are no longer competitive to a modern PC, neither what concerns price nor recording quality. For easy portable use a DAT digital audio tape recorder is a prime but costly alternative ($1000 range), but plagued with reliability and inter recorder compatibility problems. A minidisk recorder is a handy low end solution ($300 range), but because its data format includes compression there is some minor loss of sound quality and this medium is questionable for archival purposes. The computer's full audio frequency range and its (theoretical) 96 dB signal to noise ratio clearly outperforms any analog recorder. Apple Macintosh computers are historical leaders in the field and are widely used in the profession, but IBM type Windows operated PCs have essentially caught up.A basic system is outlined in this block diagram, where the bottom block shows key elements in a PC for the recorder function.
The CD stereo format with 44.1 kHz sampling rate and 16 bit encoding is a de facto standard for 'good sound quality'. This is the recommended format at the time of recording and will use up memory at a rate of some 180 KB/second or 11 MB/minute of playing time. So a first requirement is a sufficiently fast and big hard disk drive, no problem these days. An analog-to-digital interface is implemented by the sound card in the computer. Soundblaster Live is a typical benchmark, but at the PCAVTech site you can find ratings and measurements on a large number of different brands. The signal to noise ratio is typically around 75 dB, worse than theory, but still much better than for analog tape recorders. The most central software needed is the Editor, with several different functions. In the first place, to actually handle the recording and store the result:
Finally the PC should have a CD drive with burner capacity. Here you
can burn 44.1 kHz, 16 bit stereo wav file recordings into regular audio
CDs. Burner control software should come with the hardware, sometimes also
including editor software. You should also be aware of their capacity to
use CD-RW disks, rewriteable and very handy for temporary storage and inter
computer transport.
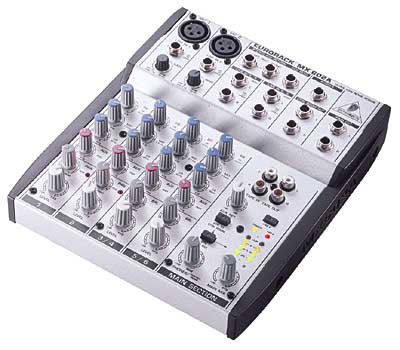
Equipment examplesThis is basically an enumeration of my current equipment.Rooms A well damped living room may be used, but perhaps you will not appreciate recordings with such a 'dry' environment, essentially devoid of reverberation. A small room with less damping is mostly catastrophic, this will enhance the room resonances, which may color the recording and convey a feeling of confinement. My best small room results have come recording my organ in the entrance lobby of a plain apartment building. The lobby itself is no bigger than a living room and little damped, but it is extended with a five stories open staircase that works well as a reverberation chamber. A special trick though is to put a thick bed mattress up against the wall behind the microphone. This is a cure against interfering reflections from the back wall being closer that it ideally should. With a big source in a small room, e.g. like some house organs, the criterion of microphone distance to be the same order of magnitude as the reverberation radius is hardly practical to use. Instead hopefully there might be some good spot where you can record in stereo as is. Otherwise there is little to do, other than to augment with additional support microphones and laboriously try out a suitable configuration. Microphones My favorites are small lavaliere mikes of the Taiwanese brand AV-JEFE, type TCM110, as they are known in Europe. In America, the same microphone is the Audio-Technica model ATR35s. Many on-line electronics stores sell that; the cheapest found was from Soundprofessionals priced at about $30 each. One is depicted on 'Mr Blockhead' below. A capsule on its cable contains a buffer amplifier, miniature battery, and switch. It has a supremely flat frequency response over the entire audio range and is omnidirectional. I also have a conventional stereo microphone, some 10 times more expensive and allegedly a good one. This is quite efficient to reproduce in stereo, but its bass register is suppressed, it has nowhere near a flat frequency response. For music recording I find results a bit disappointing unless I supplement it with other mikes. Mixer Personally, I am happy with an Eurorack MX602A ($100 range), one of
the smallest in the line from Behringer,
mixing six channels into two, including two microphone preamplifiers, pan
controls, and three-range equalizers. As that model is no longer current,
the Behinger model UB802 Eurorack 8 Input Mixer should be a suitable replacement.
It can be purchased from several on-line suppliers, including Zzounds.
There must be a host of alternative devices around.
This picture also illustrates connector problematics. At top you see (Cannon) XLR connectors for two microphone lines and 1/4" phone jacks, both types are used professionally because their plugs are reliable and stepping proof. Microphones and headphones now often have 3.5 mm plugs, mono or stereo, so you will probably need several size adapters and Y-adapters (i.e. from one stereo connector into two mono connectors). This particular mixer has four different inputs (of which two are 'stereo' such that the number of inputs is inflated to six). For each one you can individually apply gain and bass/treble equalization. Additionally each has a 'Pan' control to define how the input is delivered to the two stereo output channels. Turning the knob extremely left or right, the input will go to the left/right stereo channel alone. The intermediate pan settings allow you to continuously 'move' the input in the stereo sound image. At right there is a quartet of plain (RCA) hi-fi (phono) jacks, this is where you connect the computer sound card or a tape recorder. Here, as in so many other places the socket marking tells what should be at the far end of the cable, a classical ambiguity worth checking when you hook up the system. E.g. 'Tape out' are inputs to the mixer, you should connect them to the recorder outputs. Here you would typically need a couple of "Y adapter audio cable", such as # 42-2551 from Radio Shack. The audio section of that site contains a comprehensive catalog of available items. Also a set of elongation cables is very useful. If purchasing ready made ones, watch out that they are shielded to prevent power line hum pickup. There are unshielded ones around for high signal use, to connect headphones etc. Never let those into your house. ComputerMy current music computer is 'the old one', a 133 MHz Pentium with 64 MB memory and Windows 98. After expansion with an extra hard disk and a modern sound card it is satisfactory for recording purposes, despite its age.The simplest editor is within Windows, namely the Sound Recorder. This is seemingly useless for that intended purpose as it initially allows a maximum recording duration of 1 minute. The workaround is to prefabricate a sufficiently long file: Under 'File|Properties' and 'Convert now', select the format you want. Then make a blank recording, with no input selected, only the red button pushed. After 60 seconds, you will have a blank wave one minute long. 'File|Save as' that as "blank.wav". Now under 'Edit|Insert file', select that same saved "blank.wav". Now the new wave will become twice as long. Repeat those saves and inserts as many times you want, doubling the length each time. When the length is big enough (or when your computer memory overflows, alas that is a limit for Sound Recorder), you have a giant blank. This takes a while, but it only has to be done once. Every time you want to record, open this saved template to Sound Recorder, and make your recording over it. Then 'File|Save as' some other name, thus preserving "blank.wav". A CD burner is regularly delivered with control software, sometimes also including editing software. Mine came with Nero together with an editor capable of mp3 encoding, using by license the standard implement from the Fraunhofer Institute. Goldwave is a well known and highly capable editor. Another is CoolEdit from Syntrillium, recently engulfed by Adobe. Many American CD burners come with Adaptec software included. The latest updates of Windows Media Player also contain a CD burner utility, actually made by Adaptec. However, there are extremely tight time-critical requirements on the software to do buffer switching when you record or reproduce long files, so you cannot be confident the editor can manage that without loss of data. My outdated Media Player has repeated problems with this, it produces a glitch ever so often, even when run alone in the computer. My copies of Sound Recorder and Nero Editor can record and play back faultlessly when run alone, but things are even more difficult, should you want to time-share the computer also with a sequencer to MIDI control the instrument being recorded. I like to do that with my organ using an old version of program Cakewalk, but neither editor mentioned can cope, I get some two or three lapses per minute, making the combination useless. This must be a software deficiency with them, because I can successfully timeshare that sequencer with the less known editor Soundswell, actually written by an old colleague of mine. Thus, the safest thing is to let the computer run the editor alone during the actual recording. Also, my more common procedure is to control my organ from a separate source, a Viscount RD70-II that plays back MIDI from a diskette, a nice device once mentioned in MMD. I bought mine directly from its Italian factory - their Swedish distributor did not know what I was talking about, asking for it. Anyway, be aware that specific remarks on software are volatile - versions
are perpetually updated. You may also find useful tips in the MMD archives,
e.g. under keywords Editing,
Editor,
PC, Programs,
Windows.
Recording practiceSetting upFor a safeguard it may be good to start the system utility tool to defragment the hard disk. This takes a lot of time, but you can let it run while you set up the hardware. The essence of that operation is that files and free space on the disk are made contiguous. Then you do not unnecessarily lose lots of time to reposition the disk heads during the time-critical recording.In a practical recording situation it is common that most time is used hunting for cables, connectors, and adapters. Foresightedness could suggest what is needed, but it is always handy with a closely guarded can, full of random extra adapters. Hum in a recording is an outrage. Whenever applicable the power mains connectors should use a common ground. Don't let power and signal cables go in parallel close to each other. Possibly some of the theory above, but mainly experience will eventually lead toward a suitable microphone placement. Try to avoid or minimize disturbing sound sources. E.g. put a blower fan in a remote room, close doors, etc. Check that the microphone signals are correctly routed with the mixer 'Pan' controls. Test all microphones, only one turned on at a time. RecordingIt is important to spend time and effort trying to optimize all volume control settings. On one hand you must avoid clipping of strong signals. On the other, signal levels should everywhere be kept as high as possible, well above the inevitable hum and noise background. Do not forget to check the combined Volume control and Mixer within the computer driver software, and check for muting of unused channels.Some editors provide real time indicators to monitor current signal level during recording. These are useful to check the three important things:
The actual recording must of course be done in real time. With modern PCs this should not pose any problems. Possibly you could also time-share the PC with a simultaneously running sequencer program sending MIDI-controls to the recorded instrument. However there is always some risk of data loss if certain functions cannot be performed in time. So it is good practice to listen through your recording immediately afterwards to check that everything worked to expectations, and try again if not. Bigger steps of retreat would be to reduce sampling rate, or derive the MIDI from a source, different from the recorder computer. Post-processingChecking is a first step in 'post-processing', what you do to the material afterwards with the editor, when you can think things over and you can let the computer take its time to do complicated operations. Next step would normally be to cut away the ends of the recording to contain perhaps 2 sec of leader and 3 sec trailer silence, with gradual fades if the editor can manage that.Editors often provide 'effects' features, in particular for stripping unwanted noise and for adding artificial reverberation. I never found these worthwhile to use, since they tend to convey a prominent and uneasy feeling the recording is faked. The noise stripping may let through short bursts at random frequencies, leaving annoying 'plop' or 'rain' sounds, and it will cut away part of the natural reverberation. A 'proper' reverberation algorithm would require an inordinate amount of computation. - If you use these two processes, then do the noise stripping before any artificial reverb. The standard 44.1 kHz format .wav files can be non-destructively compressed into .zip files about 0.9 times original size which is not worthwhile. The modern and useful alternative is destructive compression using the mp3 scheme, a standard adopted by MPEG (Motion Pictures Expert Group within ITU, the International Telecommunications Union). It might be noted that the cinema industry uses other systems of their own - 'MPEG is for the TV people'. mp3 compression is a complicated operation that cannot be performed in real time. It is based on analysis of the sound in terms of what you can hear of it, from knowledge of perception, its frequency resolution, and how strong parts of the spectrum can mask weak parts into inaudibility. Then only the most audible parts are coded and preserved while the rest is discarded. A standard mp3 setting is for a data rate of 128 Kb/s, reducing file size into 0.09 of original CD. At this rate you can almost never perceive any degradation of the sound. A flexible mp3 encoder can be set to a large number of lower output data rates, meaning even smaller files, but with a correspondingly lower sound quality. A lower data rate implies a lower reproduced bandwidth, but what bandwidth is not simple to find out because this also depends on what is the actual signal spectrum. The compressed file can be converted back into its original format, but then the discarded information is of course still absent and the result is acoustically equivalent to the compressed file. The compact mp3 files are the preferred format for sound distribution
by e-mail and on web pages. To play back mp3 files there is any number
of programs around, including Media Player. The mp3 playback (decoding)
is very much simpler than the encoding and is easily made in real time.
However, when listening to a file on the net you should normally have downloaded
it first into your computer since you cannot always rely on a sufficient
transmission speed, in particular if you have a low speed connection rather
than wideband.
Appendix: Mr BlockheadAn easy way to make an artificial head might be to start from a Styrofoam wig-stand. I am a bit suspicious whether this very lightweight material is opaque enough to sound waves and would suggest you then make a more solid surface on it. For instance, glue on a few layers of heavy cloth strips as a bandage, then sand and paint it.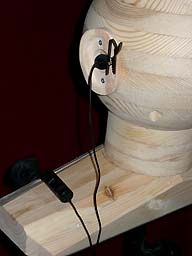
I have made an engineering kind of approximation to a head in form of an 8" dia. wooden sphere. From 20 mm material (wood, chipboard, or MDF) cut 8 circular disks using an oscillating saw. Two each of diameters 200, 196, 184, and 160 mm respectively. From the centers of the biggest four disks, cut out an additional set of 120 mm diameters, one for the top, three for the neck. Then glue and clamp the pile together. To keep the disks aligned it may be good to glue in steps, first adjacent disks in pairs, then pairs into quadruplets, finally the complete pile. In the smaller disks you can also drill center holes and use guide pins. Finally shape the sphere, using the disk joints as marks. I started coarse shaping with mallet and chisel, then went on with a grater, and finally a belt sander. I was lucky to set it slowly rotating in a lathe during the later steps, but at some effort you can manage without that. The biggest problem is then to hold the thing while working at it. Seating it on a round cooking pan may help. Anyway, the finish is a matter of looks, not sounds. Just in case I would later want to put something inside the sphere I omitted gluing the equatorial joint. Instead the two halves of the sphere are held together by four long wood screws. The 'ears' on a research quality artificial head are usually silicon
castings from the researcher's ears. Shape details as well as auditory
processing are individual to every person. This shape is believed to lie
behind human ability to discriminate sound source elevation, and front
from back. But such details are often not too important since they apply
only to high frequency sounds (say, over 5 kHz) where wavelength is comparable
to, or smaller than ear size. With lower frequency sounds you anyway have
little more than sideways discrimination of sources, except for some influence
from reflections from the shoulders. The neck of my blockhead terminates
in a 450 mm long 'shoulder' plank with a hole to accept a microphone stand,
and from which you can hang a jacket.
I made the stylized ears from a 70*45*35 mm wood block where I drilled a central 25 mm hole and rounded the outside into an oval. Then cleft the block with an oblique saw cut and did some artistic chiseling for a believable simplified concha shape. The head sphere was flattened somewhat at two diametrical places and the ears were screwed on, tilting some 10 degrees back from the vertical centerline. Into each 'ear' I put a lavaliere electret microphone, the one mentioned
above, clipped onto a mounting screw. Being omnidirectional it does not
matter whether you mount them in holes in the 'skull' or if you put them
outside, facing inward. The latter is very much simpler to do and operate.
FootnotesThis manuscript was reviewed by Richard Z. Vance. He has duplicated the system and contributed several important improvements and links. Neither of us have any commercial interest in products and brand names mentioned here as examples.
Nov. 2003 JLs, rev 2003-12-22, 2004-01-24
|
|
|
|
|
|
|
|
|
|
CONTACT FORM: Click HERE to write to the editor, or to post a message about Mechanical Musical Instruments to the MMD Unless otherwise noted, all opinions are those of the individual authors and may not represent those of the editors. Compilation copyright 1995-2026 by Jody Kravitz. Please read our Republication Policy before copying information from or creating links to this web site. Click HERE to contact the webmaster regarding problems with the website. |
|
|
||||||
|